Mastodon on Coolify
Masto.host has been great in the year and a half I’ve had my Mastodon instance running there. Hugo guided me through a smooth migration process and I stopped thinking about Mastodon hosting and updates. If you’d like to run your own instance and not have to futz with it, Masto.host is solid!
My database and media usage bumped me into an uncomfortable pricing tier, so I wondered how much pain it would be to migrate to an unused 2-core, 2GB Ryzen 9 VPS with plenty of storage.
You already know it worked or I wouldn’t have written this.
In hindsight, two fast CPU cores are okay but 2GB of memory is tight. If you’re used to self-hosting the pieces are relatively straightforward: PostgreSQL, Redis, and containers for a web interface, streaming server, and Sidekiq queue. Mastodon is not lightweight though: it’s a busy app that uses quite a bit of memory—probably more sensible for multiple people sharing a server.
If I had memory to spare I might have added Elasticsearch to the equation, but I know that’s even more of a memory hog so I didn’t bother.
What I Did
- Created a Coolify project.
- Provisioned standalone Redis and PostgreSQL services.
- Added a “Docker Compose Empty” resource with the web, streaming, and queue containers.
- Got a database dump and environment variables from a Masto.host backup.
- Configured everything like my live instance and started it up.
- Added a PostgreSQL role and imported a database dump with Coolify’s GUI.
- Confirmed that everything basically worked, then stopped my live instance to get a fresh copy of the database and the massive media folder.
- Failed to appreciate how necessary the 17GB of
caches/were. - Ran a bunch of
tootctlcommands to clean up broken emojis, account images, and media. - Added a lightweight Cloudflare Workers CDN for media files.
Coolify Project Parts
There isn’t a predefined Coolify service for Mastodon yet, but armed with Mastodon’s own Docker Compose example and my proclivity for needless adventure, I knocked out the bulk of this in about two hours.
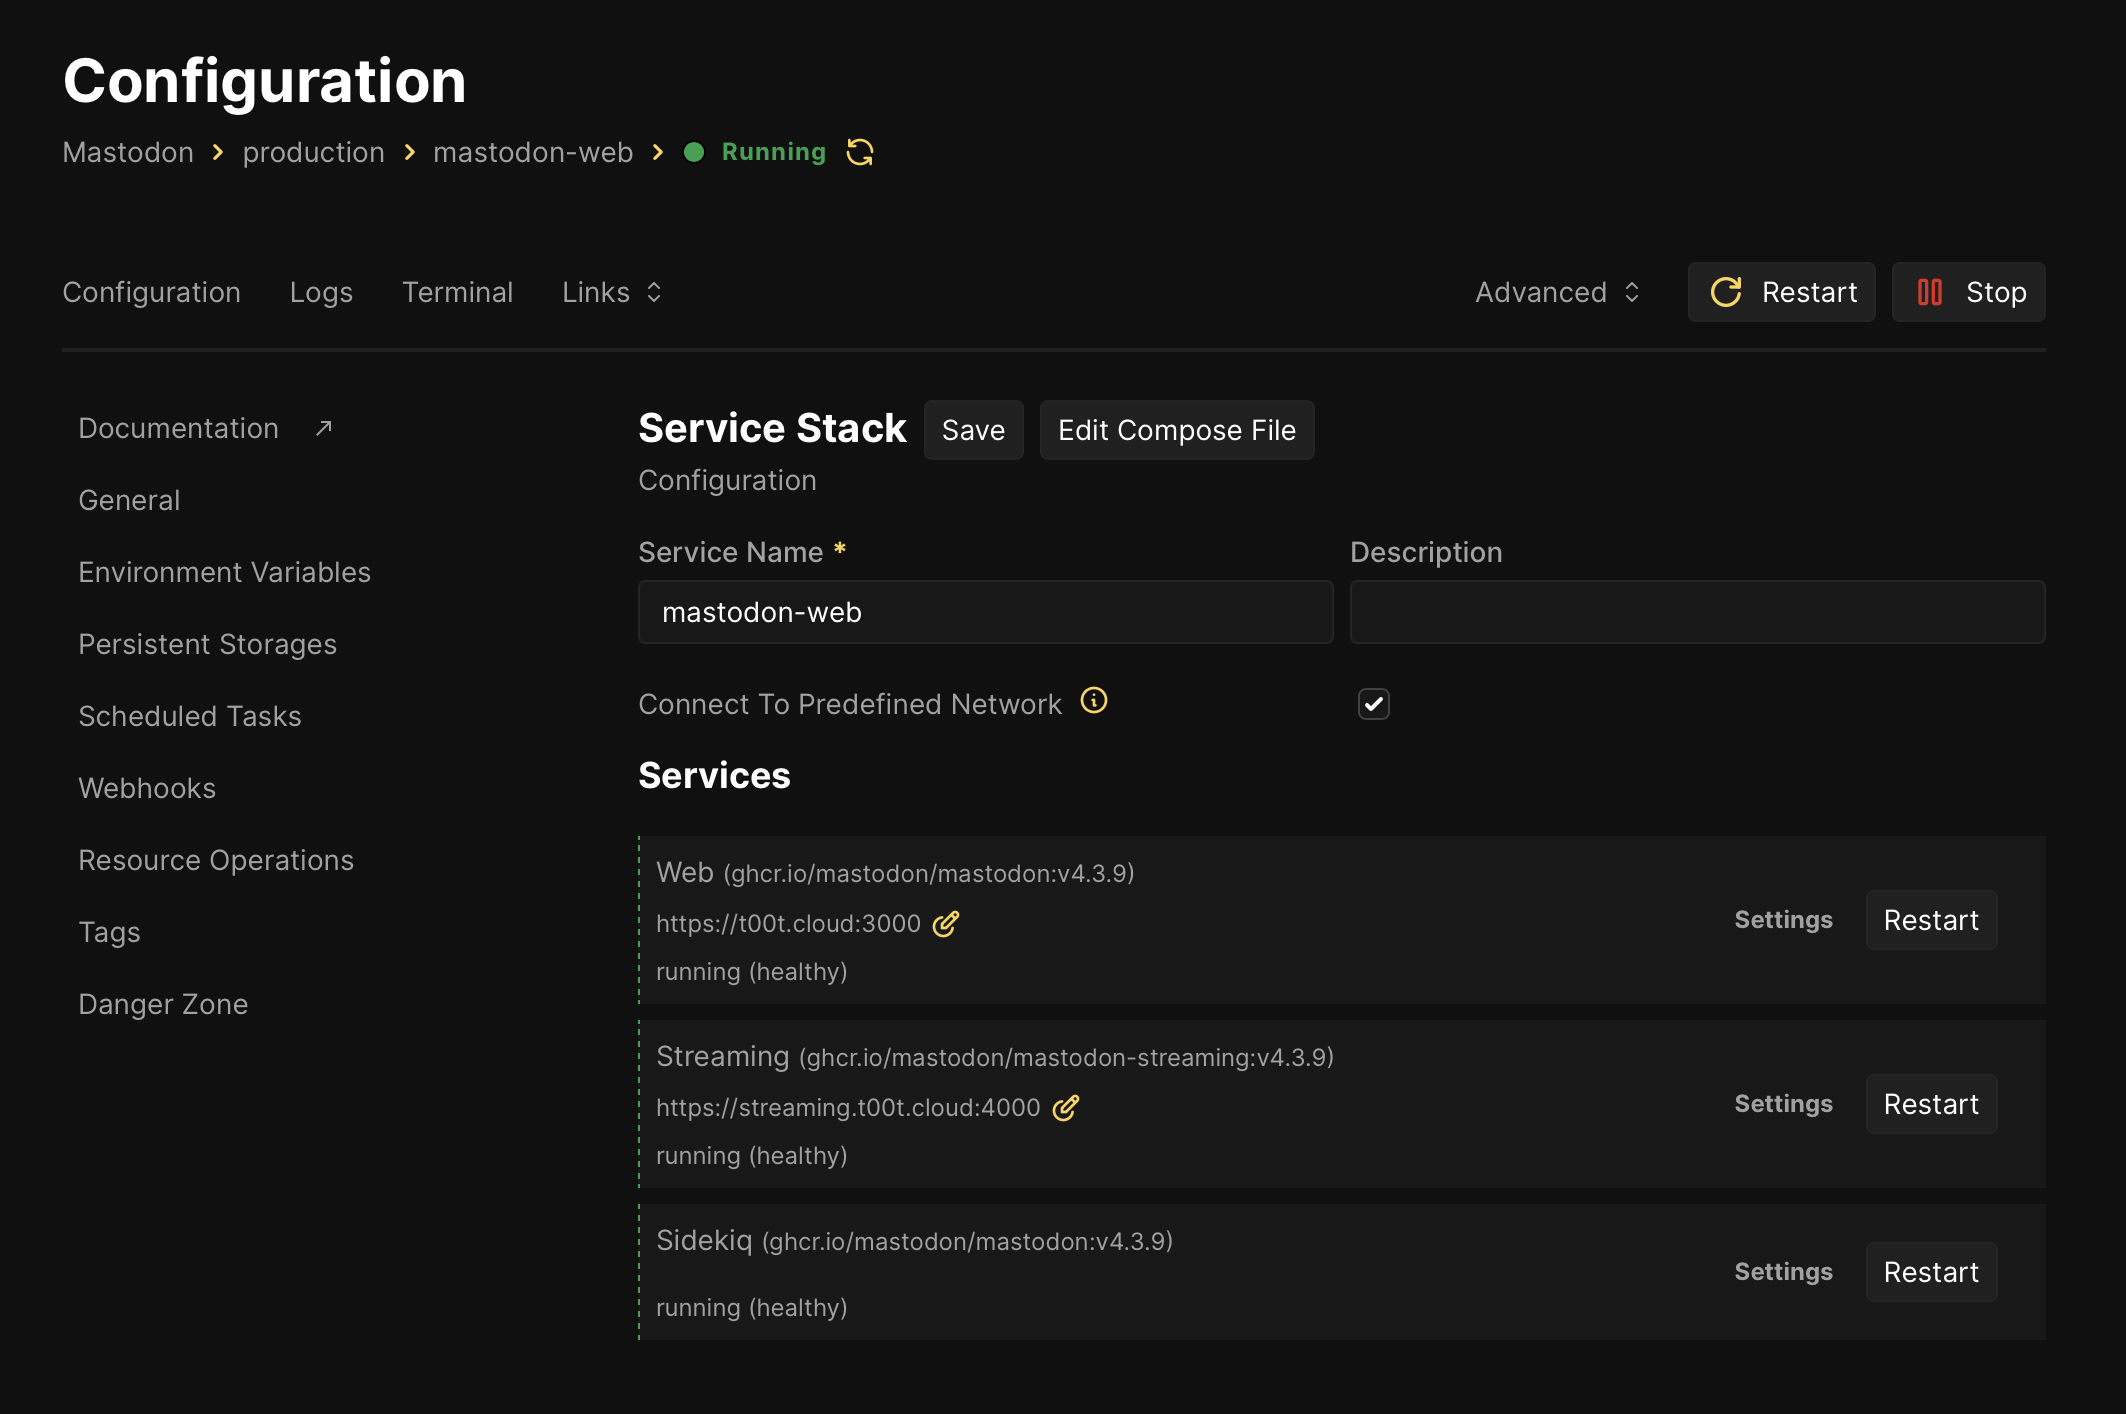
I started making a new Coolify project and provisioning standalone PostgreSQL and Redis services, then a custom Docker Compose setup for the web, streaming, and Sidekiq containers. I hacked down the example to get to this:
services:
  web:
    image: 'ghcr.io/mastodon/mastodon:v4.3.8'
    restart: always
    env_file: .env
    command: 'bundle exec puma -C config/puma.rb'
    healthcheck:
      test:
        - CMD-SHELL
        - "curl -s --noproxy localhost localhost:3000/health | grep -q 'OK' || exit 1"
    ports:
      - '3000:3000'
    volumes:
      - './public/system:/mastodon/public/system'
  streaming:
    image: 'ghcr.io/mastodon/mastodon-streaming:v4.3.8'
    restart: always
    env_file: .env
    command: 'node ./streaming/index.js'
    healthcheck:
      test:
        - CMD-SHELL
        - "curl -s --noproxy localhost localhost:4000/api/v1/streaming/health | grep -q 'OK' || exit 1"
    ports:
      - '4000:4000'
  sidekiq:
    image: 'ghcr.io/mastodon/mastodon:v4.3.8'
    restart: always
    env_file: .env
    command: 'bundle exec sidekiq'
    volumes:
      - './public/system:/mastodon/public/system'
    healthcheck:
      test:
        - CMD-SHELL
        - "ps aux | grep '[s]idekiq 7' || false"
Notice the env_file: .env lines above.
The environment variables you edit in Coolify’s GUI are stored in a .env file right alongside Coolify’s version of the project’s docker-compose.yaml file. Since the .env file is sitting right there, you can add that one env_file line to each service so it has access to the complete set of environment variables.
And there are a lot of them:
LOCAL_DOMAIN=t00t.cloud
REDIS_HOST=•••
REDIS_PORT=6379
REDIS_USER=default
REDIS_PASSWORD=•••
DB_HOST=•••
DB_USER=postgres
DB_NAME=postgres
DB_PASS=•••
DB_PORT=5432
SECRET_KEY_BASE=•••
OTP_SECRET=•••
ACTIVE_RECORD_ENCRYPTION_DETERMINISTIC_KEY=•••
ACTIVE_RECORD_ENCRYPTION_KEY_DERIVATION_SALT=•••
ACTIVE_RECORD_ENCRYPTION_PRIMARY_KEY=•••
VAPID_PRIVATE_KEY=•••
VAPID_PUBLIC_KEY=•••
SMTP_SERVER=•••
SMTP_PORT=587
SMTP_LOGIN=unsend
SMTP_PASSWORD=•••
SMTP_FROM_ADDRESS=mastodon@t00t.cloud
S3_ENABLED=true
S3_REGION=•••
S3_ENDPOINT=•••
S3_HOSTNAME=•••
S3_BUCKET=•••
AWS_ACCESS_KEY_ID=•••
AWS_SECRET_ACCESS_KEY=•••
EXTRA_MEDIA_HOSTS=•••
IP_RETENTION_PERIOD=31556952
SESSION_RETENTION_PERIOD=31556952
FETCH_REPLIES_ENABLED=false
FETCH_REPLIES_COOLDOWN_MINUTES=15
FETCH_REPLIES_INITIAL_WAIT_MINUTES=5
FETCH_REPLIES_MAX_GLOBAL=1000
FETCH_REPLIES_MAX_SINGLE=500
FETCH_REPLIES_MAX_PAGES=500
STREAMING_API_BASE_URL=wss://streaming.t00t.cloud
(We’ll come back to populating the secrets in a moment.)
I grabbed the Redis and PostgreSQL connection details from the standalone services I’d already started, and as usual I was careful to make sure the web app’s Connect To Predefined Network setting was checked.
I used self-hosted Unsend for email via SMTP and MinIO for S3 storage.
The working app stack looked like this:
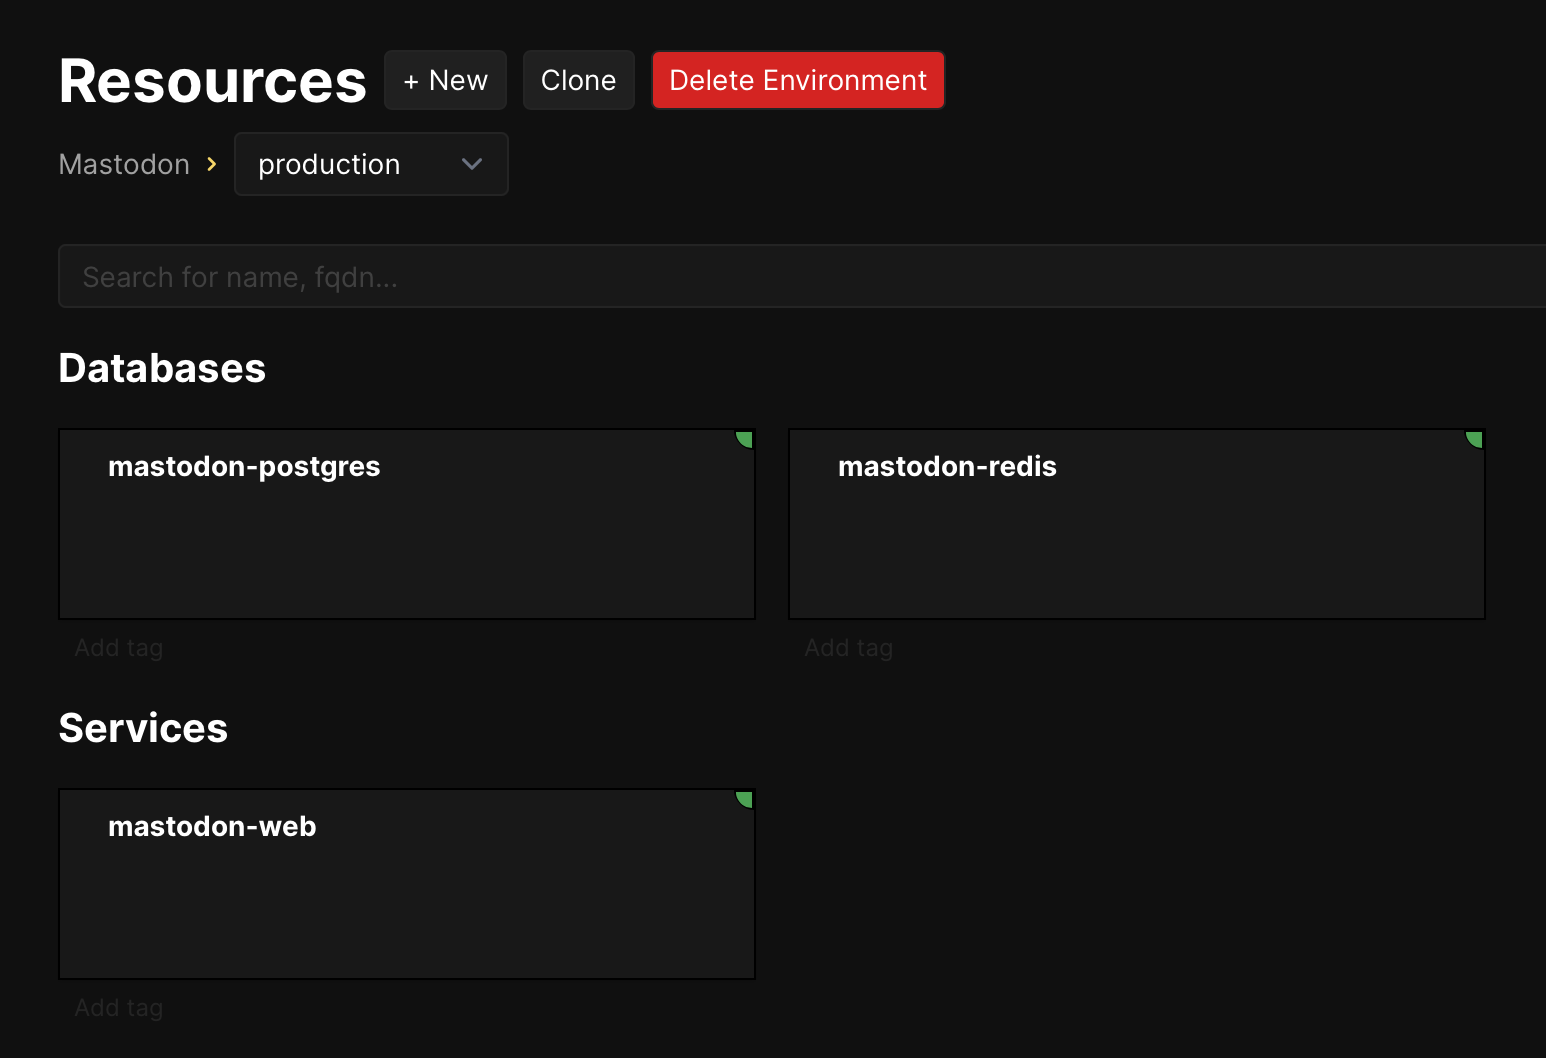
Zooming out one level to resources:
It wasn’t obvious how I could test Mastodon’s SMTP settings outside the initial setup wizard, but a Reddit post nudged me in the right direction.
First, dive into a Ruby console:
RAILS_ENV=production bin/rails c
Then create a mailer instance and send a test message:
> mailer = ActionMailer::Base.new
> mailer.mail(to: 'me@example.com', subject: 'Test', body: "You’ve got mail!").deliver
It worked on my first try, which made me feel pretty smart.
Secrets and PostgreSQL Data
Next I needed to bring in stuff from the current instance.
Masto.host makes it easy to download backups, and they come in two flavors:
- Snapshots you can download at any time that’ll be slightly stale and include a minimal set of media files.
- An up-to-date database dump and entire set of media (including caches) you have to stop your server in order to generate.
Each is an archive with contents following the same structure:
media/
pg_dump.custom
README.txt
secrets.txt
I started out using a snapshot to test the waters, and the environment variables I needed were in secrets.txt.
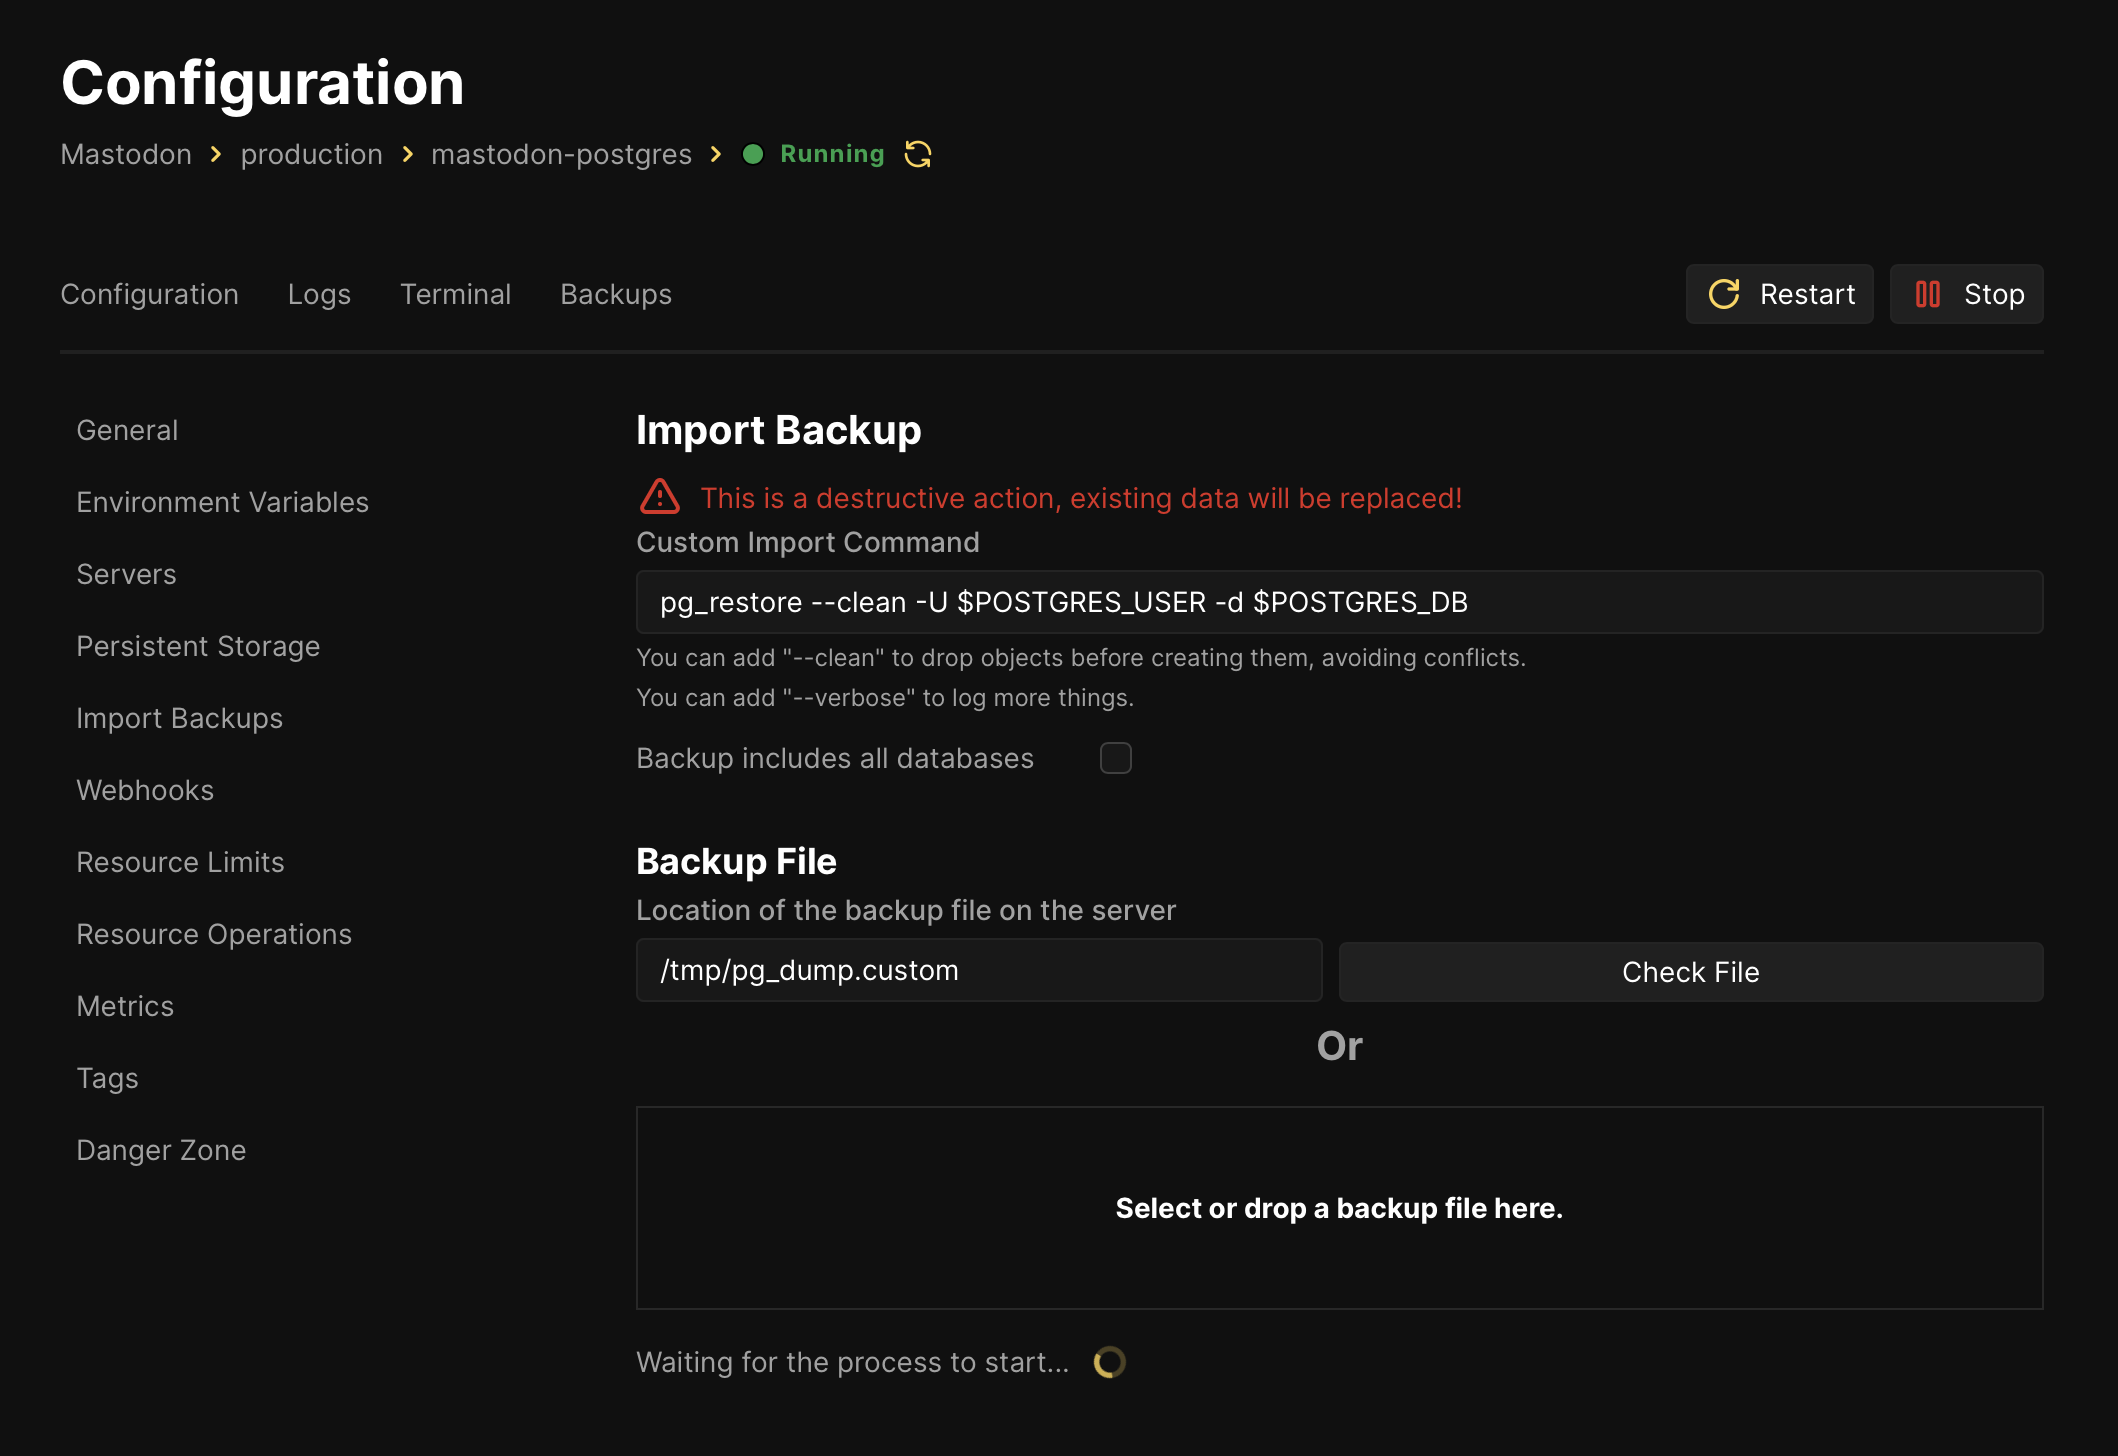
I uploaded the backup archive’s database dump to the Coolify VPS at /tmp/pg_dump.custom. (Coolify’s GUI includes an option to point to that file and import it.)
My first attempt failed because I needed to create the t00tcloud role that Masto.host relied on. (Yours will be specific to your server name.)
CREATE ROLE t00tcloud;
GRANT ALL ON SCHEMA public TO t00tcloud;
Provide the --clean option for pg_restore and everything should work.
At this point I was able to edit /etc/hosts and send my t00t.cloud domain to this new server and interact with the running web instance in a browser. Because I used one of the static snapshots, it had missing images and activity was slightly out of date.
Migrating For Real
I returned to Masto.host, stopped the server, and initiated a real-time backup.
It took around 10 minutes to generate. I downloaded its ~18GB archive, uploaded and imported the database dump, and used Transmit to sync up everything but the huge caches/ directory. This last part was a mistake, and you’d be wise to find some way of neatly merging that huge media/ directory with the one in your S3 volume.
It turns out Mastodon keeps references to what it thinks is in the cache directory, so you can’t just delete that stuff. If it thinks a file is there, it’s not going to double check—it’ll just serve an image URL and let it be broken in the web UI. (I’m sorry I let you down like that, Mastodon.)
I spent a while using tootctl commands to clean and repair missing assets.
These commands can take a long time to execute, and because Coolify’s handy in-browser terminal flakes out after a while I used SSH via a regular terminal instead. (From the server, run docker ps, look for the ID of the running web container, and run docker exec -it [id] /bin/bash to get in there.)
tootctl accounts refreshcan fix profile images and banners.tootctl media refreshcan fix file references in posts/toots.tootctl emoji purge --remote-onlycan clear out the jillions of custom emojis accumulated from other servers. (This ran for hours and there was no output; check your “Custom emojis” page at/admin/custom_emojis?remote=1to confirm it’s busy.)
Most of these commands have a --concurrency setting you can increase to significantly speed things up and/or crash your server. I did both.
Cloudflare Worker Reverse Proxy
This was a fun little side quest that’s not relevant if you use local images, aren’t using Cloudflare, or you’ve already got a CDN figured out.
I store the Mastodon server’s media in a MinIO bucket (similar to S3), and at first I was serving images directly from its URLs. But I wanted Cloudflare to be able to cache them without having it proxy the entire domain.
I don’t use Cloudflare Workers (outside of Cloudflare Pages) much, but all I needed was this workers.js file to forward requests and cache the result:
addEventListener("fetch", event => {
  event.respondWith(handleRequest(event.request));
});

async function handleRequest(request) {
  let url = new URL(request.url);

  url.hostname = "storage.m7n.foo"; // backend domain
  url.protocol = "https"; // ensure secure connection

  // create a new request preserving method and headers
  let newRequest = new Request(url, request);

  // fetch and return the response from back end
  return fetch(newRequest);
}
I attached a custom subdomain to it, which you’ll see now in URLs like this.
Conclusion
It worked. The instance behaves pretty well. Like all these other Coolify setups, establishing database backups is wonderfully simple.
If I have a real banger of a toot at some point this little instance will probably melt and struggle to stay online, so if I get a chance I’ll probably move it to one with more memory.
I ran my own instance prior to the Masto.host setup, and moving to Coolify was significantly easier now that I’m comfortable with it. I love that I’m not all that familiar with Ruby but hosting the project is comfortable with a Docker Compose setup.
I already got to update the Mastodon version, which was as simple as editing docker-compose.yaml to update the image versions and redeploying.
Hopefully something here is helpful! I’d love to know if you try this or if you noticed anything I should’ve been smarter about here.
July 20, 2025 Update
It took me a few weeks to realize I left something out that I should have remembered from my first Mastodon self-hosting experience: cleanup tasks are important to keep storage in check.
I started getting 500 errors posting images, which turned out to be my storage bucket hitting the 50GB limit I whimsically established for it. I raised that limit, added some scheduled cleanup tasks, and now my ~60GB of storage is down to 8GB. I expect it will cruise in the 8–12GB range now.
I followed pruning advice from Ricard Torres and used Coolify’s UI to add individual scheduled tasks:

Each runs in the web container, X minutes into each third hour of a given day:
0 */3 * * * tootctl accounts prune
5 */3 * * * tootctl statuses remove --days 4
10 */3 * * * tootctl media remove --days 4
15 */3 * * * tootctl media remove --remove-headers --include-follows --days 0
20 */3 * * * tootctl preview_cards remove --days 4
25 */3 * * * tootctl media remove-orphans
A few failed running for the first time—mostly processes being killed—because there was so much to churn through, but now they run smoothly.
I’ll adjust this if it’s too aggressive about pruning, but for now the cache reduction is wild and I don’t notice any significant change in front-end experience.